 |
Sharing Your Results with Others |
Oracle Discoverer Tutorial
|
Tip: Print this page.
The total estimated time you need to complete lesson 4 is 30 minutes.
Overview of Lesson 4
After you get the data you want and analyze it, you will ultimately arrive at a business decision or have data
that persuades others to make a decision. Of course, you want to share you results with others so they can see
the fruits of your labors. Discoverer provides you with a variety of options for sharing your results with others.
Using Wizards and the menu bar, you can print out your Worksheets or export them to popular application formats,
such as Microsoft Excel, and HTML. And you can also share your Discoverer Workbook with other Discoverer users
at your company.
In lesson 4, you will open the sample Workbook, Video Stores Analysis, from the database and share it
with others in each of these four ways:
- You will use the Print Wizard to select print options for printing the Worksheets.
- You will use the Export Wizard to export a Worksheet to an Excel spreadsheet.
- You will also export your Worksheet to HTML format and view the results in your Web browser.
- And finally, you will share your Discoverer Worksheet with other Discoverer users at your company.
Printing your Worksheet
To help you with printing, Discoverer uses the Print Wizard. The Print Wizard offers you more
control over what you print than the standard Print dialog of most applications.
- Connect to the Video Store Tutorial database and open the Workbook Video Stores
Analysis. Hint.
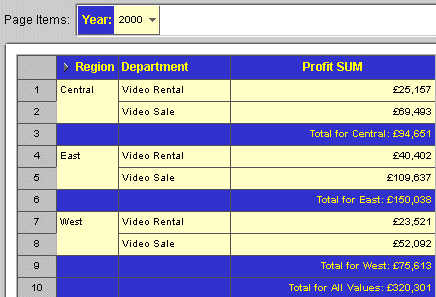
- Choose Year:2000 from the Page Items area.
- From the Discoverer menu, choose File | Print to start the Print Wizard.
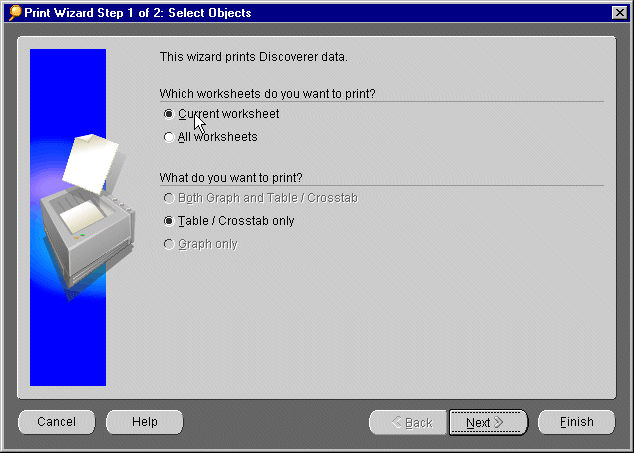
- Page 1 of the Print Wizard offers you the choice of printing the current Worksheet or all Worksheets
in the Workbook. In this case, we wish to print the current Worksheet only. Choose Current Sheet.
- Under What do you want to print?, Table/Crosstab only is selected by default. If you have created
a graph with your Workbook, you can choose either of the other options Both Graph and Table/Crosstab and
Graph only.
- Click Next to move to Page 2 of the Print Wizard.
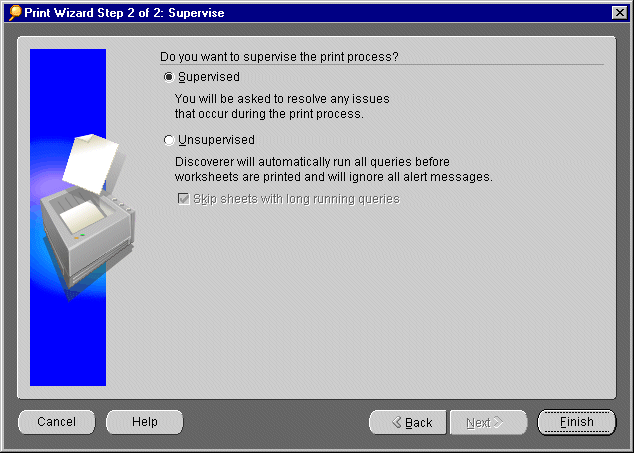
Page 2 of the Print Wizard lets you choose whether to monitor the printing process. To be sure that you are printing
the most current data in your company's database, Discoverer sends the query
for the Worksheets to the database. By clicking Supervised, you are notified if there are any issues that
need to be resolved. For example, if the query takes a long time, you may see a message asking if you wish to continue.
Under Do you want to supervise the print process? choose the Supervised option.
- If the Worksheets contain any parameters, you will be asked to choose
parameters. If so, choose the values that you want to print.
- Click Finish. The standard Print dialog appears.
- From the Printer Name drop-down list, choose the printer you want. Click OK. Note that the Print
Wizard prints only the Worksheet that is currently visible on your screen, not every combination of Page Items.
Exporting data to Microsoft Excel spreadsheet format
Some people you want to share your results with do not have Discoverer. Or, they may want to use your results
in some other format, such as an Microsoft Excel spreadsheet. Discoverer allows you to export your Worksheets and
gives you a choice of common application formats. In this part of lesson 4, you will export to Microsoft Excel
using the Export Wizard.
- Open the Video Stores Analysis Workbook. Hint.
- From the Discoverer menu, choose File | Export to start the Export Wizard.
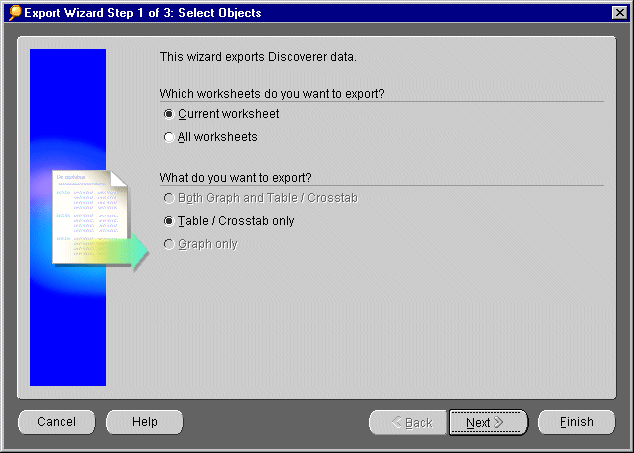
- Page 1 of the Export Wizard offers you the choice of exporting the current Worksheet or all Worksheets
in the Workbook. Choose Current Sheet.
- Under What do you want to export?, choose Both Graph and Table/Crosstab.
- Click Next to move to Page 2 of the Export Wizard.

- Page 2 of the Export Wizard lets you choose the export format and target location of the export file.
Click the down arrow underneath the question, "What export format do you want?" From the drop-down
list, choose Microsoft Excel Workbook (*.xls). Notice that you can also export to other formats, such as
Text (*.txt), CSV (*.csv), Formatted Text (*.prn), and others.
- In the text field underneath the question, "Where do you want to save the file?," notice the
name of this file; it has the three-letter file extension, .xls. If you want to change the name of this file, type
over the name in this text field but keep the .xls file extension.
- Click Next to move to Page 3 of the Export Wizard.
- Page 3 of the Export Wizard lets you choose whether to monitor the printing process. Under Do you
want to supervise the export process? choose the Supervised option. To be sure that you are exporting
the most current data in your company's database, Discoverer sends the query
for the Worksheets to the database. By clicking Supervised, you are notified if there are any issues that
need to be resolved. For example, if the query takes a long time, you may see a message asking if you wish to continue.
- Click Finish. Discoverer exports your Workbook to Excel format. The Export Log appears, which
informs you that export is complete and alerts you to any problems that happen during the export process.
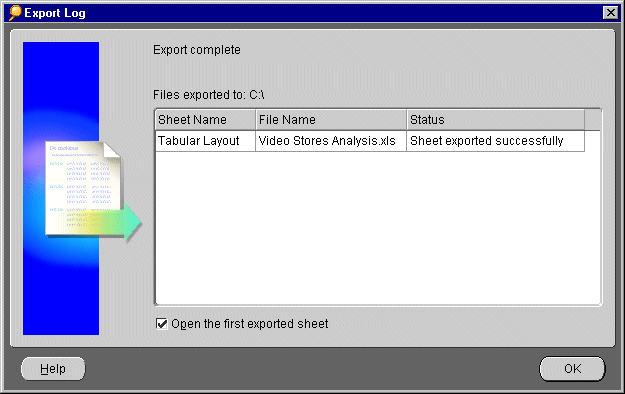
- If you have Microsoft Excel installed on your computer, put a checkmark next to the question, "Open
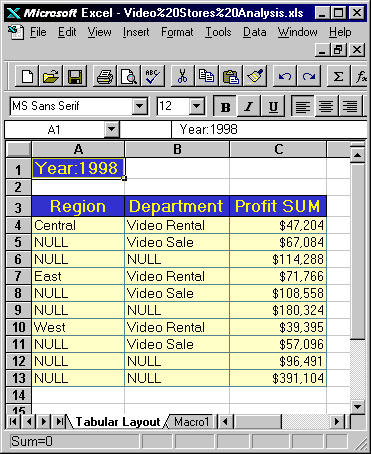
the first exported sheet?" and click OK. Your Worksheet will appear in a Microsoft Excel spreadsheet.
Compare the original Discoverer data with the exported data in the Microsoft Excel Workbook.
NOTE: You can also export to Microsoft Excel format quickly by choosing File | Export to Excel, or by
clicking the Export to Excel icon  on the toolbar.
Publishing your report on the web
Discoverer gives you the ability to turn your Worksheet into Web pages without having to know any HTML at all.
By using the Export Wizard, converting to HTML is as simple as exporting to Microsoft Excel. And you can
compare the original Discoverer Worksheet to the new HTML page directly in your Web browser.
- Return to the Video Stores Analysis Workbook.
- From the Discoverer menu, choose File | Export to start the Export Wizard.
- Page 1 of the Export Wizard offers you the choice of exporting the current Worksheet or all Worksheets
in the Workbook. Choose Current Sheet.
- Under What do you want to export?, choose Both Graph and Table/Crosstab.
- Click Next to move to Page 2 of the Export Wizard.
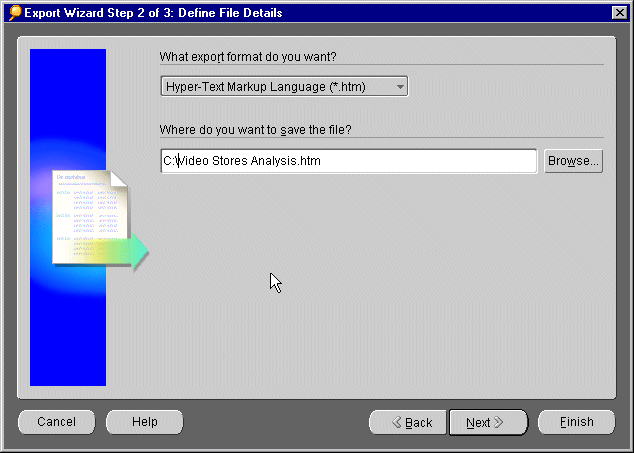
- Page 2 of the Export Wizard lets you choose the export format and target location of the export file.
Click the down arrow underneath the question, "What export format do you want?" From the drop-down
list, choose Hyper-Text Markup Language (*.htm).
- In the text field underneath the question, "Where do you want to save the file?," notice the
name of this file; it has the three-letter file extension, .htm. If you want to change the name of this file, type
over the name in this text field but keep the .htm file extension.
- Click Next to move to Page 3 of the Export Wizard.
- Page 3 of the Export Wizard lets you choose whether to monitor the export process. Under Do you want to
supervise the export process? choose the Supervised option. To be sure that you are exporting the most
current data in your company's database, Discoverer sends the query
for the Worksheets to the database. By clicking Supervised, you are notified if there are any issues that
need to be resolved. For example, if the query takes a long time, you may see a message asking if you wish to continue.
- Click Finish. Discoverer exports your Workbook to HTML format. The Export Log appears, which
informs you that export is complete and alerts you to any problems that happen during the export process.
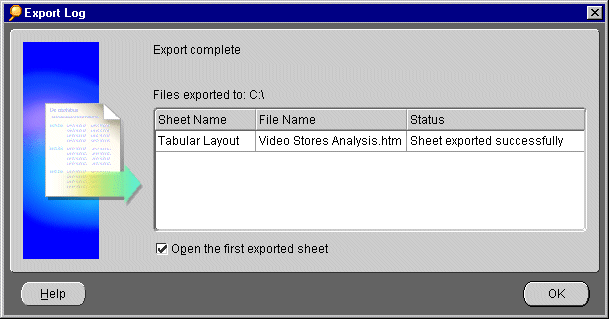
- Put a checkmark next to the question, "Open the first exported sheet?" and click OK.
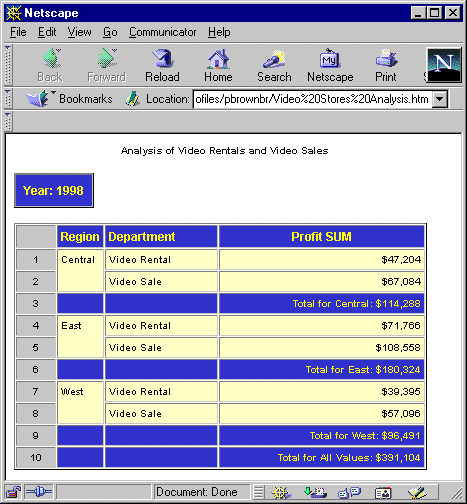
Your Worksheet will appear in your browser. Compare the original Discoverer data with the exported data displayed
in your browser.
- NOTE: You can also export to Web format ( HTML) quickly by choosing File | Export to HTML, or
by clicking the Export to HTML icon
 on the toolbar.
Sharing Workbooks
Sharing a Workbook is a privilege granted to you by your Discoverer administrator. If you are unable to share
your Workbook in this lesson, you may not have this privilege. If you cannot share your Workbook, skip this section
of the lesson and review the lesson 4 summary. If your Discoverer administrator has granted you this privilege,
you can share your Workbooks with other people at your company.
Discoverer gives you two ways to share Workbooks:
- assign one or more Workbooks to a single user.
- assign one or more users to a single Workbook.
In this lesson you will assign one or more Workbooks to a single user, and assign the Video Stores Analysis
Workbook to a user called "Public".
- Return to the Video Stores Analysis Workbook.
- From the Discoverer menu, choose File | Manage Workbook | Sharing. The Share Workbooks dialog
appears.
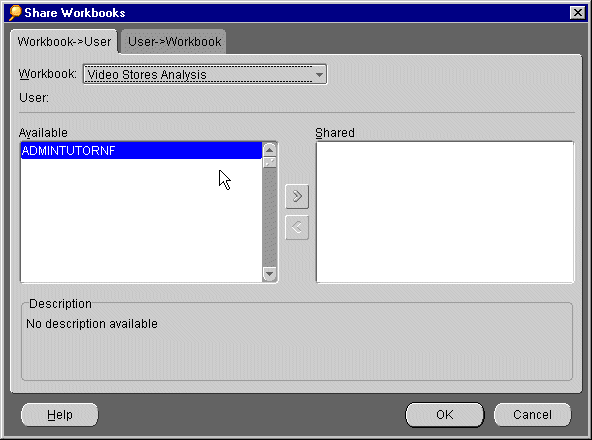
- Click the User > Workbook tab.
- To share the Workbook, Video Stores Analysis, with a user called Public, choose PUBLIC from the User pull down
list.
- Choose Video Stores Analysis from the Available list, then click the single right arrow to move Video Stores
Analysis to the Shared list box on the right.
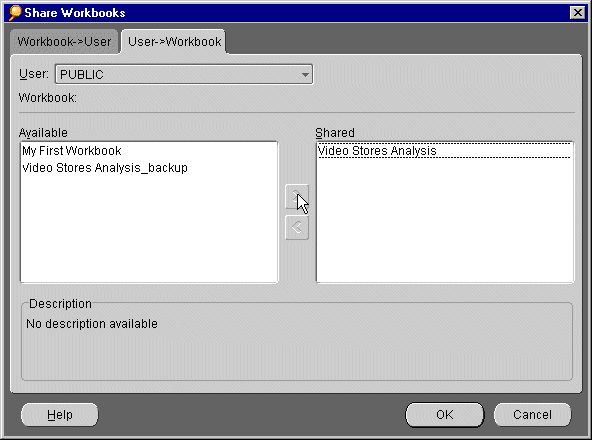
- Click OK. You are now sharing the Video Stores Analysis Workbook with other Discoverer users in your
company who are part of the Public role assigned by your Discoverer administrator. Every time you update the Workbook,
other users will get your most current version.
QUESTION: How would you assign three or four users to a single Workbook? Answer.
Summary of Lesson 4
Discoverer provides you with a variety of options for sharing your results with others. Using the Print Wizard,
you can control how you want to print your Workbooks, whether one Worksheet at a time or all the Worksheets in
your Workbook. Using the Export Wizard, you can export Workbooks to popular application formats, such as
Microsoft Excel and HTML. And you can share your Discoverer Workbook with other Discoverer users at your company.
Return to Tutorial Home Page
Answers and Definitions
How would you assign three or four users to a single Workbook?
By choosing the Workbook > User tab, you can select a Workbook and then assign as many users as you want
to it.
Query. Every time you open a Workbook or create a new one, Discoverer sends
a query to your company's database. A query is a question that Discoverer asks the database in order to
get the data you want. Queries are written in SQL, a language that databases understand. You do not need to understand
SQL to communicate with the database. Discoverer writes the SQL for you.
Parameters. Sometimes you may open a Workbook and want to see data about the
Central region, and sometimes you may want to see data about the Western. Or perhaps you want to share this Workbook
with another person, and you do not know what Region they want to see. Parameters give you and other users
a choice of filters when a Workbook opens.
Page Items. A Page Item is a special Item that groups all the data on
a page; for example, data can be grouped into separate pages by the years 1998, 1999, and 2000. On a Worksheet,
a Page Item appears above all the other column headings. This special Item means that all the data currently visible
in the Worksheet describes a year (for example 2000). By selecting different Page Items from the Page Item drop-down
list, you are actually switching pages within that Worksheet.
Copyright © 2000, Oracle Corporation. All rights reserved.